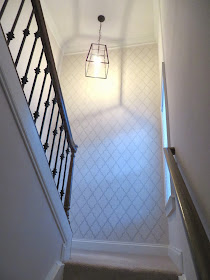
Stairs Need Love Too!
Most of the time, I use my stairs twice a day. Once on my way out the door in the morning, and once on my way to bed in the evening. And even in those two short trips, I knew something was missing. When I moved into my house almost two years ago (wow, that's crazy to think about), I renovated almost every room. Walls moved, countertops changed, but the staircase had very few alterations.
But now... ooh la la... it's just lovely!
Let's check out what it looked like when I moved in
The carpet was already removed in this picture, so that was a vast improvement already! You'll notice the teeny-tiny sconce on the wall and the plain handrail... those pieces need some love.
I'm a sucker for a good find and this light is no exception! I found this beauty at the Ballard Designs outlet store for $50... can you say "SOLD"
Next up, the balusters. I stained the handrails and put in wrought iron balusters to jazz things up a bit. After a fresh coat of paint, this is how my stairway has looked for the last 1.5 years. The downside to being in the design industry is that you're always looking for the next project, and I knew that this area of my house still had more potential.
Just before Christmas, I decided that I wanted to make the 13-foot wall at the landing of the stairs a focal point. I ordered this amazing stencil from Royal Design Studio and got to work over the holidays. I decided to use an accent color on the stencil and changed the sheen of the paint as well to give it even more contrast.
The Supplies.
Sherwin Williams "Repose Gray" with a satin sheen
One thing to know about me... I tend to be a rule-follower. Boring, I know... but in this case, it totally worked to my advantage. The day my lovely stencil arrived, I busted out the directions and read them line by line. If you decide to try this at home (which I seriously suggest that you do) pay close attention to the fact that after you put paint on your roller, roll it on to a paper towel BEFORE applying it to the wall. If you have too much paint on the roller, the paint will get under the stencil and you'll just be frustrated with a screwed up paint job!
So, here we go... the progression of "the wall"
Eeeks... the first stencil is done! Only... 28 more to go!
And we're moving on up!
Doesn't it look like wallpaper?! Ahh... I'm in love!
Once the first three rows were done, I had to bust out the ladder. By the time I got to the top row, I was also on top of the ladder... on my tippy toes... with my cell phone in my pocket so I could call for help in case I fell! I'd prooooobably suggest a taller ladder for those of you that may try this, but I'm a fan of instant gratification and I didn't want to wait to get this done any longer than I had to!
Almost done!!!
Hold your breathe... here's the final product!!!
TA-DAH!!!
I can assure you... I walk up and down these stairs SO much more now that it looks like this!
I had my doubts about how this would turn out and I have to say, I'm beyond thrilled! It was so much easier than I expected and the results just blow me away! Here are a few easy steps to accomplishing a gorgeous focal wall in your own home!
How to get this look at home!!
Step 1: Order a stencil of your choosing (I would highly recommend Royal Design Studio... great quality product, arrived in a timely manner, and the patterns are to die for)
Step 2: Choose a paint color that complements the current wall color. Again, you may consider changing up the sheen in order to create some additional contrast
Step 3: Measure the wall that you're applying the stencil to. My recommendation is to center the stencil on the wall so that it's equally spaced when you reach the side walls
Step 4: Apply paint to the roller, then roll over some paper towels to remove excess paint. Once complete, roll the paint on to the stencil
Step 5: Once all of the stencil cutouts are filled in, remove the stencil from the wall, line up in the next spot, and start again!
So there you have it. DIY-project #583 is complete at my house! I give it about....... 3 days until I think of the next area that needs some love and attention!


Such an awesome wall and you made it look easy!!!
ReplyDeleteThank you so much! The process was really pretty simple... the height of the wall was a bit of a challenge though!
Delete