Sunday, September 29, 2013

Get Trendy

Get Trendy: Design Trends For NEXT YEAR!

Hello from 35,000 feet! I'm so excited about the design conference I just went to that I had to start telling you about it as soon as physically possible!
 
For the last 4 days, I've been in Minneapolis (which is seriously an awesome city if you haven't been there) and have been learning about new products and design trends. The trip was jam-packed with seminars, but I always say you have to make time for some fun when you travel! I managed to fit in a Twins game (my first MLB game outside of Turner Field in Atlanta) as well as one memorable girls' night out with some new friends.

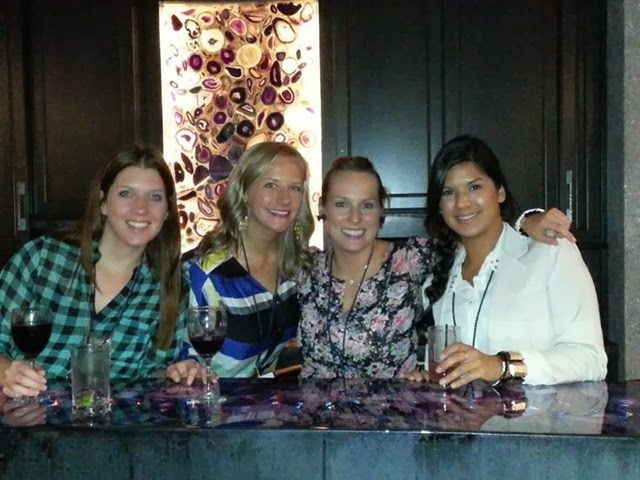
Meet Niki, Carly, and Brigette... they are some supremely talented designers from across the country! I could dive into alllll of the shenanigans of our evening, but I suppose I've gotta get back to business......
 
First things first... TRENDS! I officially want to find out who I have to bribe to become a part of the "Color Management Group". This is a group of designers in the fashion and design industries from all over the world and what I'm about to tell you might just blow your mind... This group already knows which colors will be popular anywhere from 1-3 years from now. How do they know this top-secret information you ask?? Because they get to pick the colors!
 
Here is a little bit of top-secret insight in to the trends you'll be seeing in the next year or so.
Right now we're seeing a lot of bold and intense colors in the design field. In the coming year though, these vibrant colors will start to take on a more muted tone, giving off a more "mature" look. As colors start to tone down, pastels will begin to emerge (lots of light pink and light blue to come in fashion soon... lucky for all of those friends of mine that are having babies)! These pastels will create a soothing palette in the home. Because color is a form of expression, the bold and intense colors that we're seeing today won't go away altogether. They'll continue to appear, but as more of an accent rather than filling the entire room. Instead of a whole Kitchen full of bright cabinetry, perhaps there will be accent cabinets in a bright color... or maybe the back of a cabinet that has glass doors is where that "color pop" will be incorporated.

Photo courtesy of Ghislaine Vinas Interior Design. Photo by Elizabeth Felicella
Eat in kitchen by Ghislaine Vinas with white cabinets, stainless steel square tile backsplash, round pendant lights, light blue walls and a long turquoise dining table surrounded by modern white chairs
This Kitchen is a great example of more subdued colors on the cabinetry and walls with the accent "color pop" coming from the table. Also... take note of the lighting over the island... more to come on that a little later!
 
Next up... High Contrast.
This is currently seen in so many of the popular Kitchen and Bath designs and it will remain that way in the future. But like most things, we'll see it evolve and change in the coming year. White cabinets are by far and away the most popular cabinet color on the market right now. Crisp, clean white. You'll usually see this paired with a dark, espresso-colored island or perhaps dark countertops. That bold, opposite-ends-of-the-spectrum contrast will start to meet more in the middle in the coming years.

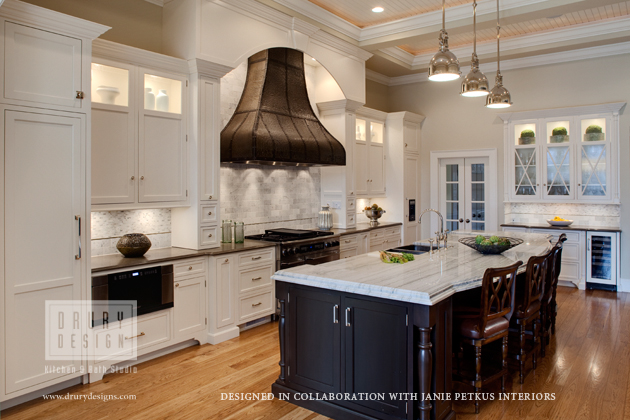
Photo Courtesy of: Drury Designs

Here's a prime example of a classic Kitchen with the strong contrast between stark white cabinets and the dark espresso island. Below is an image of what we can expect "high contrast" to become in the future!

Photo Courtesy of: Benjamin Dhong Interior Design
The island becomes a little lighter in color and the perimeter cabinets are a little darker. There's still a ton of visual interest between the two finishes, but the contrast will begin to soften in the coming year.

 What's next... LIGHTING! Lighting has become an art in and of itself. Currently, a typical Kitchen island will feature smaller pendant lights above it. Moving forward... you'll start to see over-sized lighting in the Kitchen becoming really popular. There may be fewer decorative lights, but the ones that are installed will be statement pieces. Check out a couple examples below! You can also see some over-sized lighting in one of my recent projects!

Photo Courtesy of: Better Homes & Gardens
White & Bright Kitchen

Photo courtesy of: homedit


I could literally go on forever about this stuff! Texture will also be making a huge appearance in the future... but there's so much to cover on that, so I'll be covering it next time! Thanks for reading and I'll be back soon!

Monday, September 23, 2013

The Ugly Duckling of Decatur

The Ugly Duckling of Decatur

 Many of you may be familiar with Pinterest... if you're anything like me, you can spend hours on it at a time and not even realize it. In the design industry, we love the wonderful world of Houzz. Houzz.com is a one-stop resource for any remodeling ideas you could possibly think of.

In the past month, Houzz has featured two projects that I have worked on. Let's take a peek at one of them...

This renovation really is a story of the ugly duckling turning into the beautiful swan. On a charming street in downtown Decatur, GA, sat a dilapidated green house that seemed to be hopeless. With the help of the Renewal Design-Build team, the clients were able to see the potential of this home and made an offer on the property.
Looks like a lost cause, right? Well, I hate to tell you this my friends, but you're dead wrong!

Due to the historic location of the property, the architect was faced with a lot of restrictions for the addition to this home. He worked his magic and created a plan that exceeded the clients expectations. This also gave me a beautiful blank canvas to work on the kitchen and bathroom designs. Here's a few pictures of the finished product!
The new Kitchen sits in the back of the house and looks out to the pool that was built during this renovation as well. By incorporating the large center island, cabinets to the ceiling, and large pendant lights, I was able to highlight the 10-foot ceilings and overall scale of the room.

I'm fairly certain I could start my day getting ready in this Master Bathroom! The architectural detail of the sliding doors ties in with the color of the Espresso cabinets, and let's be honest... the "egg tub" (as I like to call it) would be the perfect place to relax!

 
This ended up being one of my favorite rooms in the house. The Guest Bath vanity is an antique piece that the clients found at Scott Antique Market. If you live in or near the Atlanta area, I HIGHLY recommend you check it out... it's amazing! You can find all types of unique treasures there... but I digress...

This clawfoot bathtub was salvaged from the original house. It was refinished by a local company and the charm and character add a wonderful finishing touch to this space. A custom shower curtain track is installed on the ceiling and the drapery in the front covers all of this from being shown.


Here's a view of the exterior after we completed the project! A lot of teamwork went into this renovation and I'm so excited to share it with you! For more pictures and information about the project, I encourage you to check out the Houzz article: New Life for a Historic Georgia Fixer-Upper
 
 
I'm heading to a design conference in Minneapolis for the rest of the week, but I'll be back soon!
  
 
All photos courtesy of Renewal Design-Build


Saturday, September 21, 2013

A Perfect Palette

A Perfect Palette


As a designer, I get to work on some pretty awesome projects (both large and small). I'm not gonna lie though, as rewarding as it is to see these creations come to life for others... I also like to be sure I bring some creativity into my own home. Working for a remodeling firm, we get products delivered all the time on palettes... yep... nasty, splinter-filled palettes. Like a lot of things though, one mans trash is this designers treasure! 
 
Meet my palette.
This beauty measured in at about 48" x 48" and it was ready for its' shining moment. All it needed was some elbow grease, a power sander, and some polyurethane!
 
The first step was to remove some of the center boards to expose what would later become my "shelves". This was no easy feat. It was the middle of August in Atlanta and it was H.O.T.  hot that day (hence the miniature white fan)! After prying off the center boards... it was time for the power sander.
 
I'm a girl that likes to get dressed up and do my hair, but I'll be honest... I seriously LOVED using the sander. I had my safety goggles on and I felt invincible. Before my eyes, the rough surfaces of the palette became smooth and the character in the wood really started to expose itself.
 
Oh yeah... I was proud of myself! After this photo op, I hosed down the palette to get all of the small dust particles off of it and let it dry overnight.
 
I went back and forth on what color I wanted the finished product to be, but after seeing how great the natural look of the wood was, I decided a clear coat of polyurethane was all it needed. This was a great call... the natural beauty of the wood was even more pronounced after applying this finishing coat.
 
Now it was time to give this perfectly-sanded palette its new home! I have a buffet in my Dining Room and it was screaming to have something installed above it. I didn't want the palette to be sitting directly on the buffet for fear of scratches, but I wanted it to appear that way. After some measuring and some hammering, the picture hooks were in place and ready for the final installation!
 
Voila!! Here it is... the finished product! I bought some antique martini glasses a while ago that fit perfectly on the shelves. A few bottles of wine and some other accessories I picked up while traveling in Italy, and this palette went from drab to fabulous in just a couple days!


Materials Needed:
- Palette (Picked up for free from work)
- Hammer (Used one that I already had at the house)
- Power Sander (Borrowed from a friend, but you can rent these at Home Depot, Lowes, etc)
- Polyurethane (~$15)
- Paint Brush (~$6)
- Picture Hooks (~$3) (I recommend choosing some that hold considerably more weight than what you are hanging... better to be safe than sorry)
Total Project Cost:  $24
 
 
Hope you enjoyed this DIY craft... until next time...


All photos are my own


Friday, September 13, 2013

Live. Loft. Love.

Live. Loft. Love.

Loft Renovation in Decatur, GA
 
 
Welcome to my first "official" post!
 
I'd like to introduce you to one of my favorite projects. This was a whole-house renovation in a loft near downtown Decatur, GA. The house functioned well for the clients, but aesthetically, it wasn't quite what they were looking for... this is where I come in.
 
After meeting with the client and laying out the space, I made a few minor suggestions that added a bar, fireplace/TV focal wall, additional linen storage in the Guest Bath, and more!
 
BEFORE:  The Kitchen was open to the Guest Bedroom and the dark cabinets/countertops made the room feel small and enclosed
 
BEFORE:  Doors... Doors Everywhere! The existing Guest Bathroom featured a whole lot of doors and not a lot of storage space. Never fear, I've got a solution for this :)

AFTER:  You'll see the addition of the fireplace/TV built-in here. The fireplace uses Bio-Ethanol fuel and requires no gas or electrical to make it function... great for adding a fireplace in a space where one doesn't currently exist!
 
AFTER:  The vertical pattern of the backsplash tile accentuates the height of the ceilings in this loft.

AFTER:  Using the Miele microwave and plumbed coffee system allowed for a seamless install in the cabinetry (Seriously... I'd never leave this house... you practically have Starbucks in your Kitchen!)
 
AFTER:  The trough sink was a design challenge in the Master Bathroom that led to me working with our countertop fabricator to create a custom Corian sink

AFTER:  Now here is one of my favorites! The custom concrete countertop and sink incorporated with this bad-to-the-bone faucet are just to die for. Having the faucet mounted on the mirror adds another dimensional layer to the space

AFTER:  Remember all of those doors... Well, I proposed to close the existing closet doorway to allow space for this awesome floating linen storage. The closet entrance was relocated to the Guest Bedroom. Also, the pendant on the right side of the vanity offers an asymmetrical balance to the large mirror on the left side.
 
 
I certainly enjoyed working on this project, and hopefully you enjoyed learning a bit more about it. As always, if you have questions about any of the products used in this renovation, don't hesitate to ask!
 
 
Until next time...


(All photos courtesy of Renewal Design-Build)