Pages

Tuesday, January 28, 2014

Master Bath Beauty: The Finishes

Master Bath Beauty: The Finishes

A couple weeks ago I posted about a Master Bath renovation that I was working on. If you haven't had a chance, check out the design options that the homeowners had to choose from here

Working out the design and functionality of a space is typically the hard part... but when it comes to picking out the finishes, I'm a happy girl! For me, I love to bask in the beauty of the latest products and find unique pieces for each space that I work on. While we're still a few weeks away from the finished project, I do want to share some of the items that will be going into this fabulous space! And... you might get a couple sneak peeks of the progress made thus far!

I always try to get an idea of the feeling a client wants a room to exude before I start with the finishes. In this instance, the clients wanted something more masculine in style with darker colors, interesting textures, and unique fixtures. They literally allowed me to have so much fun pulling samples... and I'm thrilled to share their selections with you. Off we go!!

The Bathtub: 
This freestanding bathtub is from one of my all-time favorite companies based right here in Georgia. MTI has some of the most amazing bathtub designs on the market... They are functional. They are show-pieces. And the "Elise 2" model is no different!

The Faucet:
Kohler is king in the plumbing industry. They have been around forever and continuously develop beautiful plumbing fixtures for the home. The Kohler "Falling Water" faucet will be wall-mounted on a mirror at each sink. The finish on this is called "Vibrant Brushed Bronze" and it's one of my new favorites. It has a slight gold undertone to it... it's absolutely stunning in person!

The Sink:
Sometimes the complaint with vessel sinks is that they aren't deep enough. Well, Decolav's semi-recessed sink solves that problem. The sink is about 5.5" deep, but only 2" are above the countertop. Don't you just love when function and aesthetic work together so beautifully?!!

The Tile:
Hold your breathe... this tile is literally incredible in person. I wish you could feel the texture of this through the screen! The "Zebrano" collection by Artistic Tile is in a league of its own. Artistic Tile is known for some remarkable pieces and this one is no exception. This will be installed on a feature wall in the shower as well as on the vanity wall!
And, HELLO Ann Sacks! The "Lucian Metallics" tile collection is absolutely stunning. This bronze, metallic finish plays off of the color of the plumbing fixtures so perfectly! It's always important to do your research though... this tile isn't functional in wet spaces, so we had to limit it's use to the vanity wall. But I have no doubt, a little bit will go a long way when it comes to this beauty!

The Lighting:
 Marble Slab Cylinder Pendant
I mentioned earlier that I like to find unique pieces for each project, and I have to say... this pendant is the epitome of unique! The Antiqued Brass pendant is paired with actual white marble to give this phenomenal play on textures and colors. Shades of Light did it again by providing me a great selection of seriously fabulous lighting! 

Alright, alright... I've made you wait long enough! Here are a couple shots of some of the tile work. There is definitely some dust on the tiles, but even with that, it's starting to become clear just how incredible this Master Bathroom is going to be! 

Here is the accent wall in the shower featuring the Zebrano tile. I wanted to elongate the space as much as possible, so I decided to run the tile vertically. The area that is cut out will feature a soap/shampoo niche, and the plumbing that you see to the right of the niche will be the tub filler. Remember, this bath will have a tub/shower room!!

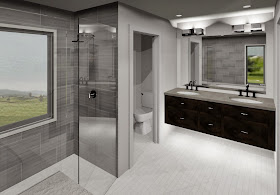
I have a crazy, and probably unhealthy, obsession with this wall! The blank space between the tile will be a counter-to-ceiling mirror and the faucet will be wall-mounted. The vanity cabinets are floating with under-cabinet lights below to create additional ambiance. 

I don't know about you, but I could certainly get used to getting ready in a bathroom as gorgeous as this one on a daily basis! As SOON as this project wraps up, you'll be the first to know! I can't wait to share the before and after photos with you!
Another CLeaR design... almost complete!

Saturday, January 18, 2014

Stairs Need Love Too!

Stairs Need Love Too!

Most of the time, I use my stairs twice a day. Once on my way out the door in the morning, and once on my way to bed in the evening. And even in those two short trips, I knew something was missing. When I moved into my house almost two years ago (wow, that's crazy to think about), I renovated almost every room. Walls moved, countertops changed, but the staircase had very few alterations. 
But now... ooh la la... it's just lovely!

Let's check out what it looked like when I moved in
The carpet was already removed in this picture, so that was a vast improvement already! You'll notice the teeny-tiny sconce on the wall and the plain handrail... those pieces need some love. 

I'm a sucker for a good find and this light is no exception! I found this beauty at the Ballard Designs outlet store for $50... can you say "SOLD"

Next up, the balusters. I stained the handrails and put in wrought iron balusters to jazz things up a bit. After a fresh coat of paint, this is how my stairway has looked for the last 1.5 years. The downside to being in the design industry is that you're always looking for the next project, and I knew that this area of my house still had more potential. 

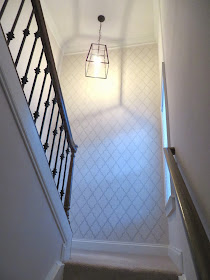
Just before Christmas, I decided that I wanted to make the 13-foot wall at the landing of the stairs a focal point. I ordered this amazing stencil from Royal Design Studio and got to work over the holidays. I decided to use an accent color on the stencil and changed the sheen of the paint as well to give it even more contrast. 

The Supplies. 

Sherwin Williams "Repose Gray" with a satin sheen

One thing to know about me... I tend to be a rule-follower. Boring, I know... but in this case, it totally worked to my advantage. The day my lovely stencil arrived, I busted out the directions and read them line by line. If you decide to try this at home (which I seriously suggest that you do) pay close attention to the fact that after you put paint on your roller, roll it on to a paper towel BEFORE applying it to the wall. If you have too much paint on the roller, the paint will get under the stencil and you'll just be frustrated with a screwed up paint job!

So, here we go... the progression of "the wall"
Eeeks... the first stencil is done! Only... 28 more to go!

And we're moving on up!

Doesn't it look like wallpaper?! Ahh... I'm in love!

Once the first three rows were done, I had to bust out the ladder. By the time I got to the top row, I was also on top of the ladder... on my tippy toes... with my cell phone in my pocket so I could call for help in case I fell! I'd prooooobably suggest a taller ladder for those of you that may try this, but I'm a fan of instant gratification and I didn't want to wait to get this done any longer than I had to!

Almost done!!!

Hold your breathe... here's the final product!!!
TA-DAH!!! 
I can assure you... I walk up and down these stairs SO much more now that it looks like this! 

I had my doubts about how this would turn out and I have to say, I'm beyond thrilled! It was so much easier than I expected and the results just blow me away! Here are a few easy steps to accomplishing a gorgeous focal wall in your own home!


How to get this look at home!!
Step 1: Order a stencil of your choosing (I would highly recommend Royal Design Studio... great quality product, arrived in a timely manner, and the patterns are to die for)

Step 2: Choose a paint color that complements the current wall color. Again, you may consider changing up the sheen in order to create some additional contrast

Step 3: Measure the wall that you're applying the stencil to. My recommendation is to center the stencil on the wall so that it's equally spaced when you reach the side walls

Step 4: Apply paint to the roller, then roll over some paper towels to remove excess paint. Once complete, roll the paint on to the stencil

Step 5: Once all of the stencil cutouts are filled in, remove the stencil from the wall, line up in the next spot, and start again!


So there you have it. DIY-project #583 is complete at my house! I give it about....... 3 days until I think of the next area that needs some love and attention! 


Wednesday, January 8, 2014

Turn Up the Radio... I'm ON AIR!!

Turn Up the Radio... I'm ON AIR!!

Happy Wednesday, Everyone! 

I'm FREAKING OUT over here! So far 2014 is proving to be one of the best years I've had in recent memory... and we're only 8 days in. So, let me recap the last 48 hours for you (so that you can freak out along with me). 

Yesterday was a day full of meetings... back-to-back-to-back meetings. When I finally got to check my email for the day, I noticed a shiny little note from someone at Atlanta Home Radio. There's this fantastic radio show called "At Home with Paisley" that airs every Thursday at 3pm in the Atlanta area, and NATIONWIDE via podcast. The show is hosted by Paisley McDonald who is a great interior designer and contributor to HGTV.com. To make a long story short (and mostly because I can't contain my excitement), I have been invited to be a part of the show in February... AHHHHHH!! Feel free to join me in jumping up and down for a minute!


I will be meeting with Paisley in February to discuss my career in design, my inspirations, as well as trends for 2014 in the kitchen and bath industry. I'm not sure when the interview will air, but you can bet that you will be the first to know. Anyway, I was just too dang excited not to spill the news as soon as it was confirmed. 

I'm telling you people... 2014 is totally living up to (and exceeding) my expectations! 

Check back in a few days... I'll have an update on that awesome Master Bathroom project that I've been working on. We'll be looking at all of the products that will be going into the space - they're phenomenal!


Thursday, January 2, 2014

New Year, New Adventures!

New Year, New Adventures, New Projects!

Whew... what a whirlwind the last two weeks have been! A trip to New Jersey for Christmas, a Great Gatsby-themed New Years celebration, and now it's back to the grind of beautifying the world one kitchen and bath at a time! Below you'll see the beginning of a Master Bathroom transformation I'm working on, but first, I have some homework for you!!

I posted a few months ago about being selected to participate in the National Kitchen & Bath Association's "30 Under 30" program. Well, I am officially one month (to the day... not that I'm counting or anything) away from being whisked away to Las Vegas to bring you the most current trends and products in the kitchen and bath industry. What are the hot new colors? Are black and white appliances making a come back? What minor updates can give you the biggest bang for your design buck? All of these questions and more will be answered while I'm on this trip! 

SO, what I need from you is this... email me at aCLeaRdesign1@gmail.com with the following: 
What questions do you have when it comes to remodeling, or design in general? Are there any products you're curious about?

I am going to have so many resources at arms-length when I'm at this conference and want to be sure I am giving you all that you want to hear!
_________________________________________________________________

Alright, on to the fun stuff! I have a Master Bathroom renovation underway that is going to be absolutely amaaaazing! It should be done by early February and I want to invite you to be a part of this transformation! I'll be taking you step-by-step through the design process, finish selections, and eventually, the completed project.

When I met with these clients initially, they mentioned that they were inspired to call Renewal Design-Build based on a project that I had previously worked on (which of course had me loving them right away- hehe)! They live in a more traditional home, but wanted to bring some contemporary flair into their Master Suite. After discussing ideas and overall vision for the space, I went to the drawing board and came up with a couple different concepts.

Current Floor Plan: 
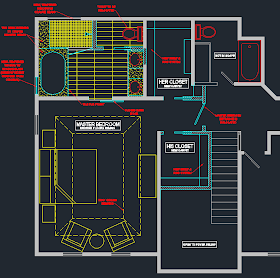
Here are some of the goals. The homeowners wanted to gain more closet space, increase the size of the shower, and maintain a bathtub (if possible).

Design Concept #1: 
This plan relocates most of the plumbing fixtures in the space. It creates a large shower and yet still allows space for a bathtub. The existing landing next to the stairs was "dead space" that I decided to take over as a secondary closet. The existing bathroom and bedroom remain the same size and yet are so much more efficient. 


Design Concept #2: 
No, you aren't seeing things. The entire Master Suite flip-flops in this option. This creates an enormous Master Closet (Sex and the City style) as well as a tub/shower room (see renderings below). The plan gives ample vanity space and puts the Master Bedroom in the back of house. 


What typically happens during the conceptual design presentations is that parts and pieces from each plan are combined to create "THE PLAN". This project was no different. From Concept #1, they liked the bathroom/bedroom remaining in their current locations as well as taking over the landing space for the second Master Closet. From Concept #2, they loved the idea of a tub/shower room and a longer vanity space. It was up to me to put on my thinking cap and make these changes happen. See the final floor plan below!!

Final Floor Plan:
Voila!! And there you have it!  This is the final floor plan for this project and it's literally being built as I type this! A lot of Master Bathrooms have those enormous corner bathtubs that take up so much space, and this bath was no different. By removing that tub, I was able to create the tub/shower room that the client wanted so much! Relocating the vanities allowed for almost 9 ft of counter space. 


That takes us through the conceptual design phase of this project! Next time, we'll discuss the finish selections process and all of the phenomenal materials that will be used in this space. Shortly after that, you'll see the finished space... it will blow you away!

Happy New Year!!!